
🎨 SECTION 1: LOW-RANGE HEAT COLORING (FLAME PAINTING)
This section details the precise, controlled thermal oxidation methods required to draw out vibrant low-range coloration from the solid copper elements of the matrix without distorting the pattern or altering the structural alloy bonds beneath.
1. Surface Polishing & Pre-Color Preparation
The final color response is heavily dictated by the mirror reflection of the metal underneath.
The Polish Threshold: Take the completely compressed, smooth matrix sheet to the polishing arbor. Buff the flat face to a high-polish finish using a fine rouge or finishing compound.
The Pattern Contrast: High-polishing optimizes the thin-film refraction on the copper cells while allowing the silver-copper eutectic channels to stay bright and reflective, creating an intense visual separation between the metals.
2. The Chemical Scrub & Cleaning Routine
The lower temperature color range is hyper-sensitive to external contamination. Any residual polishing grease, shop dust, or skin oils will instantly ruin the color transformation.
The Deep Clean: Scrub the polished face aggressively with a clean abrasive pad and an oil-free, grease-cutting cleaner (like dish soap, Penny Brite, or acetone).
The Validation Test: Rinse under running water. The water must sheet off the face in a completely flat, continuous film. If the water breaks, splits, or beads up anywhere, oils are still present. Re-scrub until it passes.
Drying Profile: Blot the piece completely dry with a fresh, lint-free paper towel.
3. Handling Strictly by the Edges
The Rule: From the exact millisecond the sheet passes the water-sheet test, never allow bare skin to contact the flat face of the piece.
The Rationale: Fingerprints contain natural acids, sweat, and salts. If finger oils touch the copper face, the heat will permanently burn those oils into muddy brown, gray, or black smudges, permanently ruining the clean color fields. Handle the workpiece exclusively by its outer edges using clean copper tongs, tweezers, or gloved fingers.
This rule applies after its colored as well because the acidity in finger oils will fade the colors over time.
4. Thermal Execution: The Low-Range Spectrum (300°F – 500°F)
The Setup: Place the clean piece face-up on a fresh soldering board or inside a dedicated, clean toaster oven.
The Firing Technique: If using a torch, apply a soft, broad, dancing flame uniformly across the piece. Avoid concentrated hot spots. Watch the copper surface systematically shift through the low-temperature chemical oxidation phases:
Pale Salmon & Pink (Initial heat activation)
Bright Metallic Gold
Deep Antique Bronze
Vibrant Autumn Orange and Red (The absolute target sweet spot for the cells)
5. Stopping the Reaction: The Solid-Steel Heat-Sink Freeze
Because the oxide film grows with every single degree of temperature change, the color will rapidly run past orange into purples and muddy blacks if the heat is left inside the block.
The Rule: Do not use liquid clear sprays or resin sealants. Applying wet coatings directly to these delicate low-range golds and oranges distorts the thin-film light refraction, causing your hard-earned colors to instantly fade, shift, and turn muddy.
The Execution: The exact microsecond your perfect target orange or red blooms, instantly remove the flame and drop the hot metal completely flat onto a massive, clean, chilled solid steel bench block. The heavy steel acts as an instant heat sink, sucking the residual thermal energy completely out of the copper on a dime. This instantly freezes the chemical reaction, locking in the brilliant color perfectly without leaving a single water spot or blemish.
🔬 SECTION 2: CORE FABRICATION TECHNIQUES
1. Wire Selection & Measurement
The Wire Formula: The wire matrix itself is constructed from 100% solid copper. There is no silver wire inside the core of the twist. The silver pattern lines are created entirely by the silver-copper eutectic solder alloy during the flooding stage.
The Wire Measurement: Pull a continuous strand of copper wire straight from the spool spanning across both outstretched arms (a double arm's length).
The Closed-Loop Fold: Cut the double arm-length strand, then fold it exactly in half. This creates a single continuous piece of copper with a permanent, closed loop at one end and two loose tails at the other. This configuration completely eliminates loose wire slippage in the drill hook during high-torque twisting.
2. Twisting & Natural Consistency
Vise and Drill Anchoring: Clamp the two loose tails of the folded copper wire tightly into a heavy, stationary bench vise. Hook the closed, folded loop end directly over a small hook or screw locked into the chuck of a variable-speed hand drill.
Tension Control: Step back until the copper wire rope is completely taut. Throughout the entire twisting process, maintain a steady, firm, unyielding pull backward with your body weight to prevent the copper from buckling, kinking, or bunching up.
The Execution: Run the drill at a slow, controlled speed. Continue spinning until the copper spirals are tightly compressed, creating deep, sharp, repeating ridges along the continuous copper rope.
Natural Consistency: Twisting one single, long continuous strand automatically creates matching twist density from end to end without needing to manually count drill rotations. You only need to calibrate twist density if combining separate twists or executing an opposite/reverse twist pattern.
3. Cutting, Sizing, & The Foundation
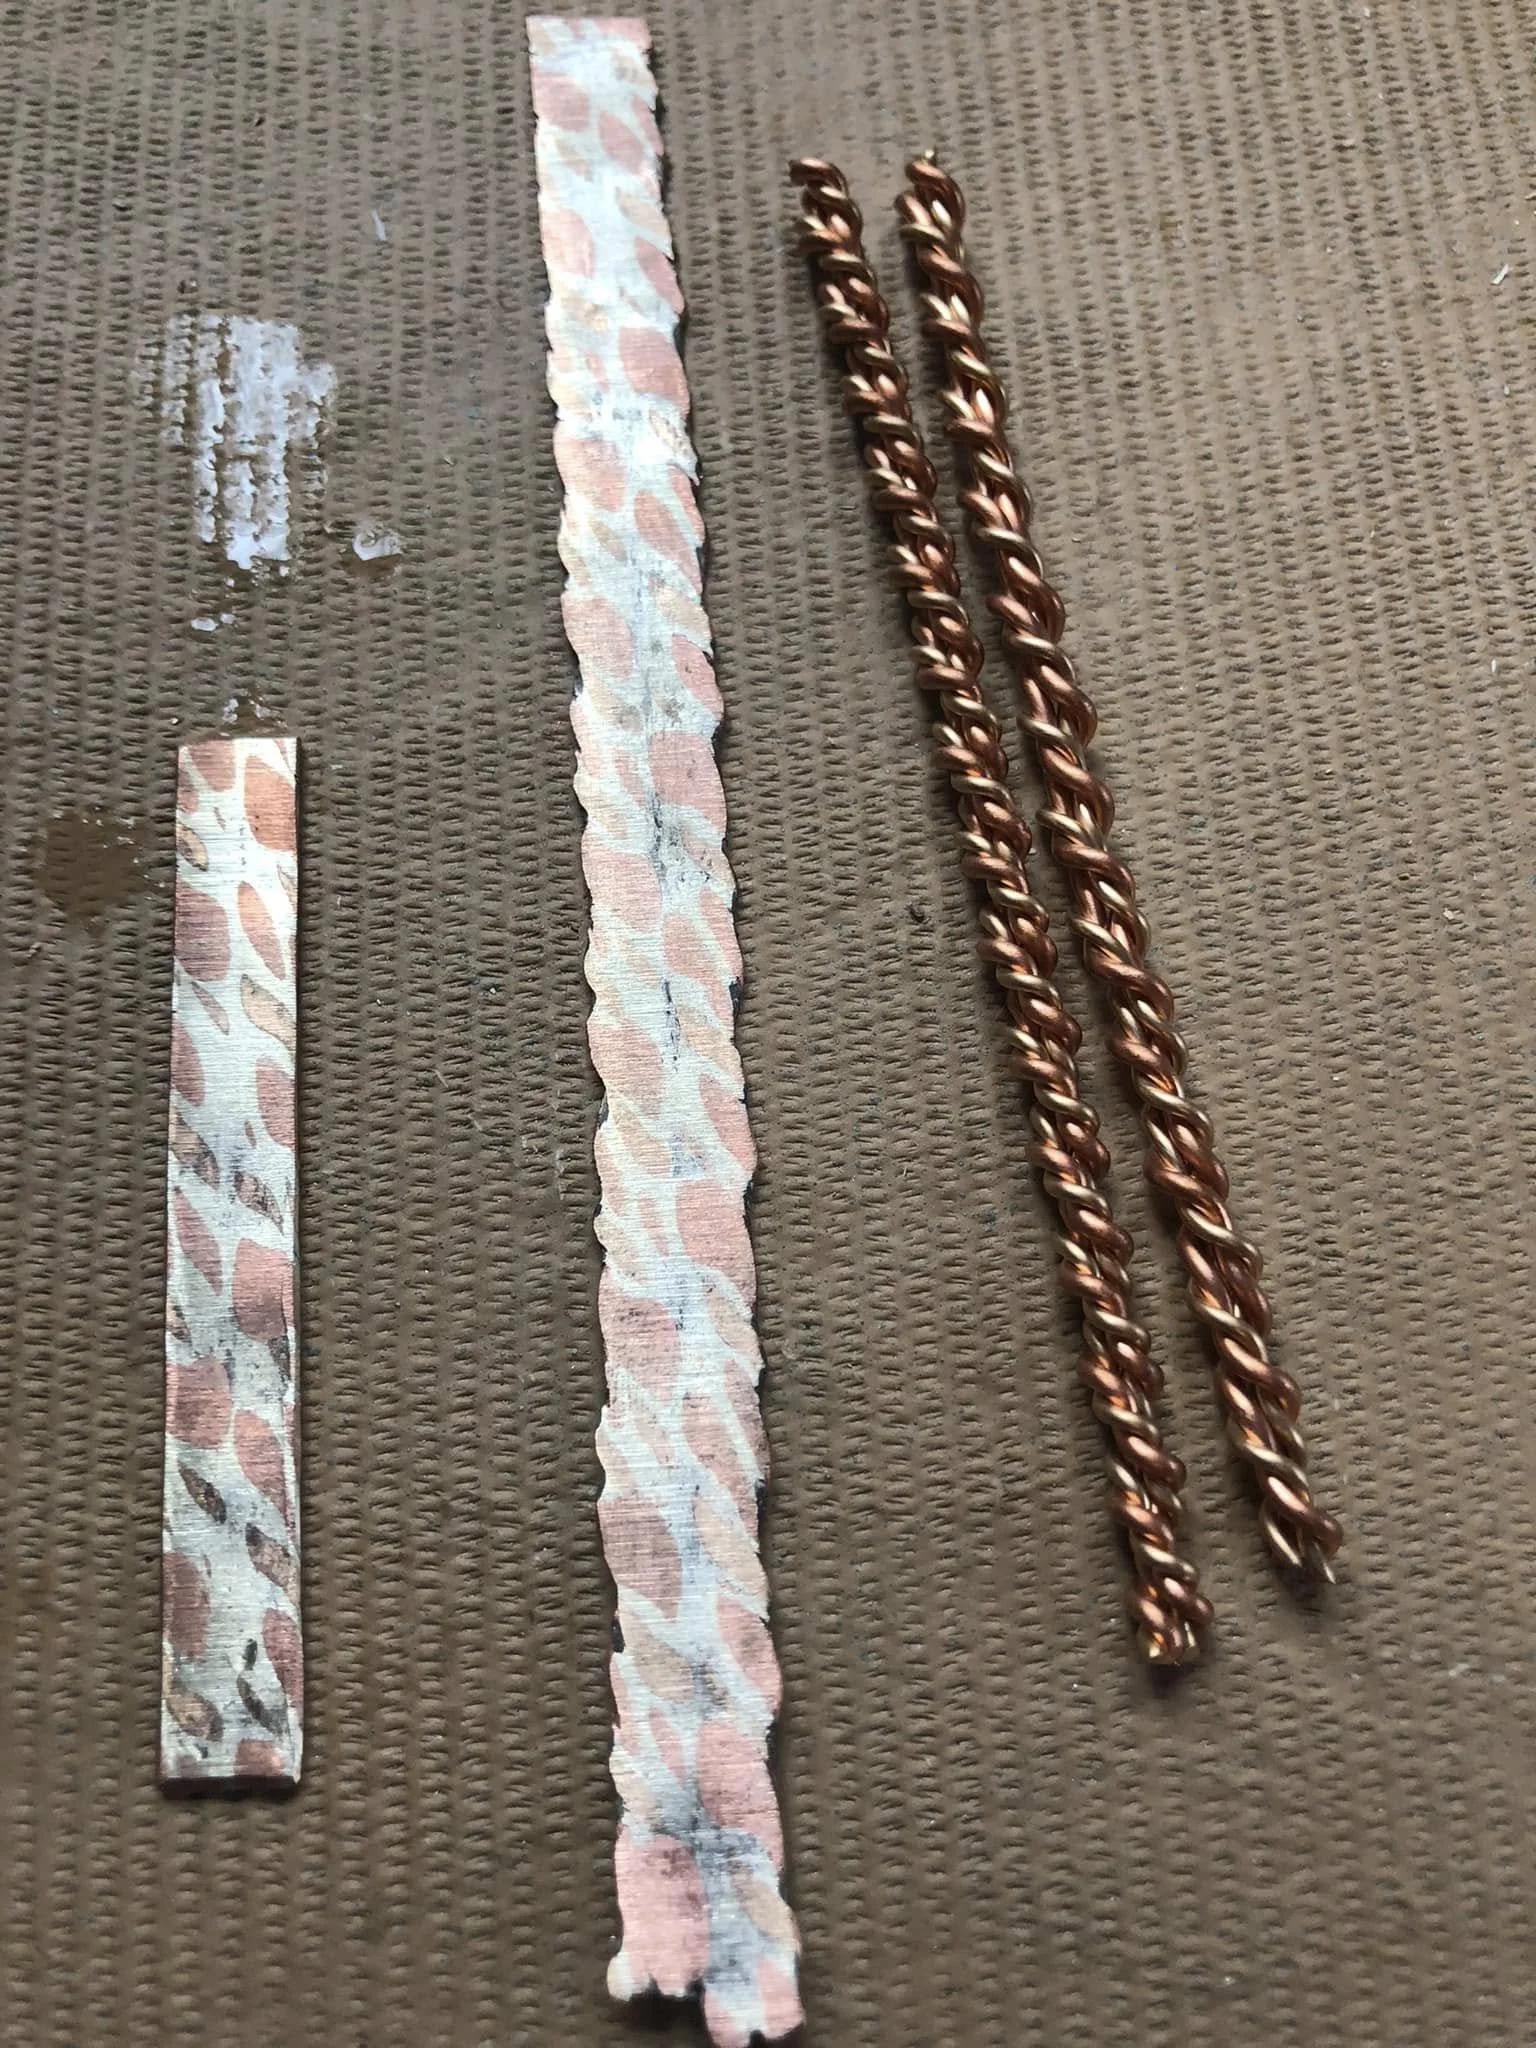
The Master Segment Cut: Release the long braided copper wire rope from the vise and drill. Lay it out flat. Using heavy wire cutters, clip the very first piece to an exact length of 5 inches.
Material Scaling: Use that first 5-inch piece as your physical master measuring guide. Line it up directly against the remaining continuous braided copper strand to cut identical 5-inch pieces. If the first long strand runs out of length, use those exact measurements to twist a second continuous strand. Repeat the cuts until you have exactly 8 identical 5-inch wire segments.
The Copper Sheet Foundation: The matrix must be aligned and built on a flat sheet of solid copper.
The Safety Border Length: Cut the solid copper sheet so it has about 1 cm of extra length extending past the 5-inch wire segments. This extra room creates a safety border on the ends, acting as a dam to contain the liquid solder.
Width Alignment: Pack all 8 completed 5-inch wire segments tightly side-by-side on a flat bench block. Measure the total collective width of the grid array. Cut the width of your copper sheet so it matches that total width perfectly.
4. Matrix Binding (Optional Step)
The Material: Use a very thin gauge of stainless steel binding wire.
Double-Back Twist Prep: Take the thin stainless steel wire, double it back on itself, and twist it together first to create a strong, reinforced braided binding wire segment.
Secure the Ends: Take this pre-twisted, doubled-back stainless wire and wrap it all the way around the aligned wire-and-sheet configuration. Pull it taut and twist the two loose ends tightly together to lock the clamp.
Placement: Bind the copper wires tightly to the sheet only on the very outer ends of the piece. This step holds the rows of twisted copper ropes locked down flush against the backing plate so they cannot slip, separate, or shift during handling.
5. Solder Flooding & Thermal Testing
Flux Coating: Cover the entire wire-and-sheet matrix heavily in a standard flux paste (like a traditional boric acid paste flux). Ensure it is packed deep into all the valleys between the ropes so it can melt entirely through and touch everywhere on the metal.
Pre-Heating: Ignite the torch and heat the entire billet uniformly. Avoid targeting the solder wire or top surface directly at the start; draw the heat through the mass of the copper plate.
The Solid Dot Thermal Test (Optional Step): As the billet heats up but before the solder is fully ready to flow, you can briefly touch your silver-copper eutectic solder wire to a section of the hot copper. The goal is to melt off just a small, solid dot of solder onto the piece. Watching that solid dot gives you a perfect visual indicator—the exact millisecond that dot collapses and runs fluidly, you know the entire mass has safely reached perfect soldering temperature.
Feeding the Solder: Continuously feed the wire solder into the piece until the entire billet is fully covered. Always buy and have significantly more solder wire on hand than you think you need—filling a heavy, high-mass piece completely requires a large volume of wire solder and takes a long time.
Eliminating Gaps: Keep feeding solder wire until there are absolutely zero visible gaps, pockets, or air holes remaining along the sides or top face of the billet.
6. The Saw Workaround & Steel Stripping (Critical Sequence Step)
The Timing: This step must happen immediately after the solder flood cools and completely before the billet is placed in the pickle pot.
The Action: Because the eutectic solder flows incredibly well, the thin stainless steel binding wire often gets permanently soldered and fused to the ends of the copper block. To remove it, take a jeweler's saw or hack saw and saw both ends of the copper plate completely off right inside the binding wire line.
The Chemical Rationale: Slicing the ends off clean removes 100% of the trapped steel wire fragments from the workpiece. If steel wire touches a standard sodium bisulfate pickle pot, it creates a galvanic reaction that turns the acid into a ferric solution, ruining the bath and causing a copper-flashing effect that will accidentally plate a muddy pink layer over your jewelry.
7. Gap Correction & Re-Soldering Session (The Secret Liquid Flux Trick)
The Inspection: After the steel wire is sawn off and the ends are squared, inspect the piece for gaps or side pinholes.
The Pickle Clean: Now that all steel is completely removed, submerge the billet safely into the acid pickle bath to strip away the hard firescale and oxidized glass crust.
Scratching Out Old Flux: Use a needle, an awl, or a thin, sharp-pointed hand tool to physically scratch out any old, trapped, dirty flux remaining deep inside the open pocket. Solder will not flow into a pocket blocked by uncleaned residue.
The Secondary Flux Secret (Optional Step): For this second or any further soldering sessions, do not reuse standard paste flux. Instead, coat the area heavily with a self-pickling liquid flux (like Batterns or a standard green liquid flux). This specialized liquid flux penetrates microscopic crevices and chemically breaks down any hidden or tiny remnants of old, glassed-over flux that your needle missed.
Re-Heating the Mass: Bring the torch back to the billet. This second heating session will take a significantly longer time because the workpiece is no longer a collection of loose wires; it is now a dense, solid hunk of thick metal that absorbs immense heat.
Reflowing Solder: Bring the entire mass up to temperature until the existing metal liquefies and flows together [Brass and Copper Soldering]. The self-pickling liquid flux will actively clean the deep pocket under the flame, allowing the fresh wire solder to flow fluidly and fill the gap completely flush with the surrounding surface.
Repeat Sequence: If any deep pinholes or side voids remain after the second pour, repeat the entire cooling, pickling, scratching, and re-soldering sequence until the piece is a 100% solid, flawless metallic block.
8. Solder Clean-Up & Detail Levelling
The Timing: Take the solid, flaw-free block straight to the polishing motor or rotary tool before it undergoes any flattening.
The Gear Specification: Use Dedeco radial bristle wheels or 3M rubber bristle discs mounted to your lathe or rotary tool.
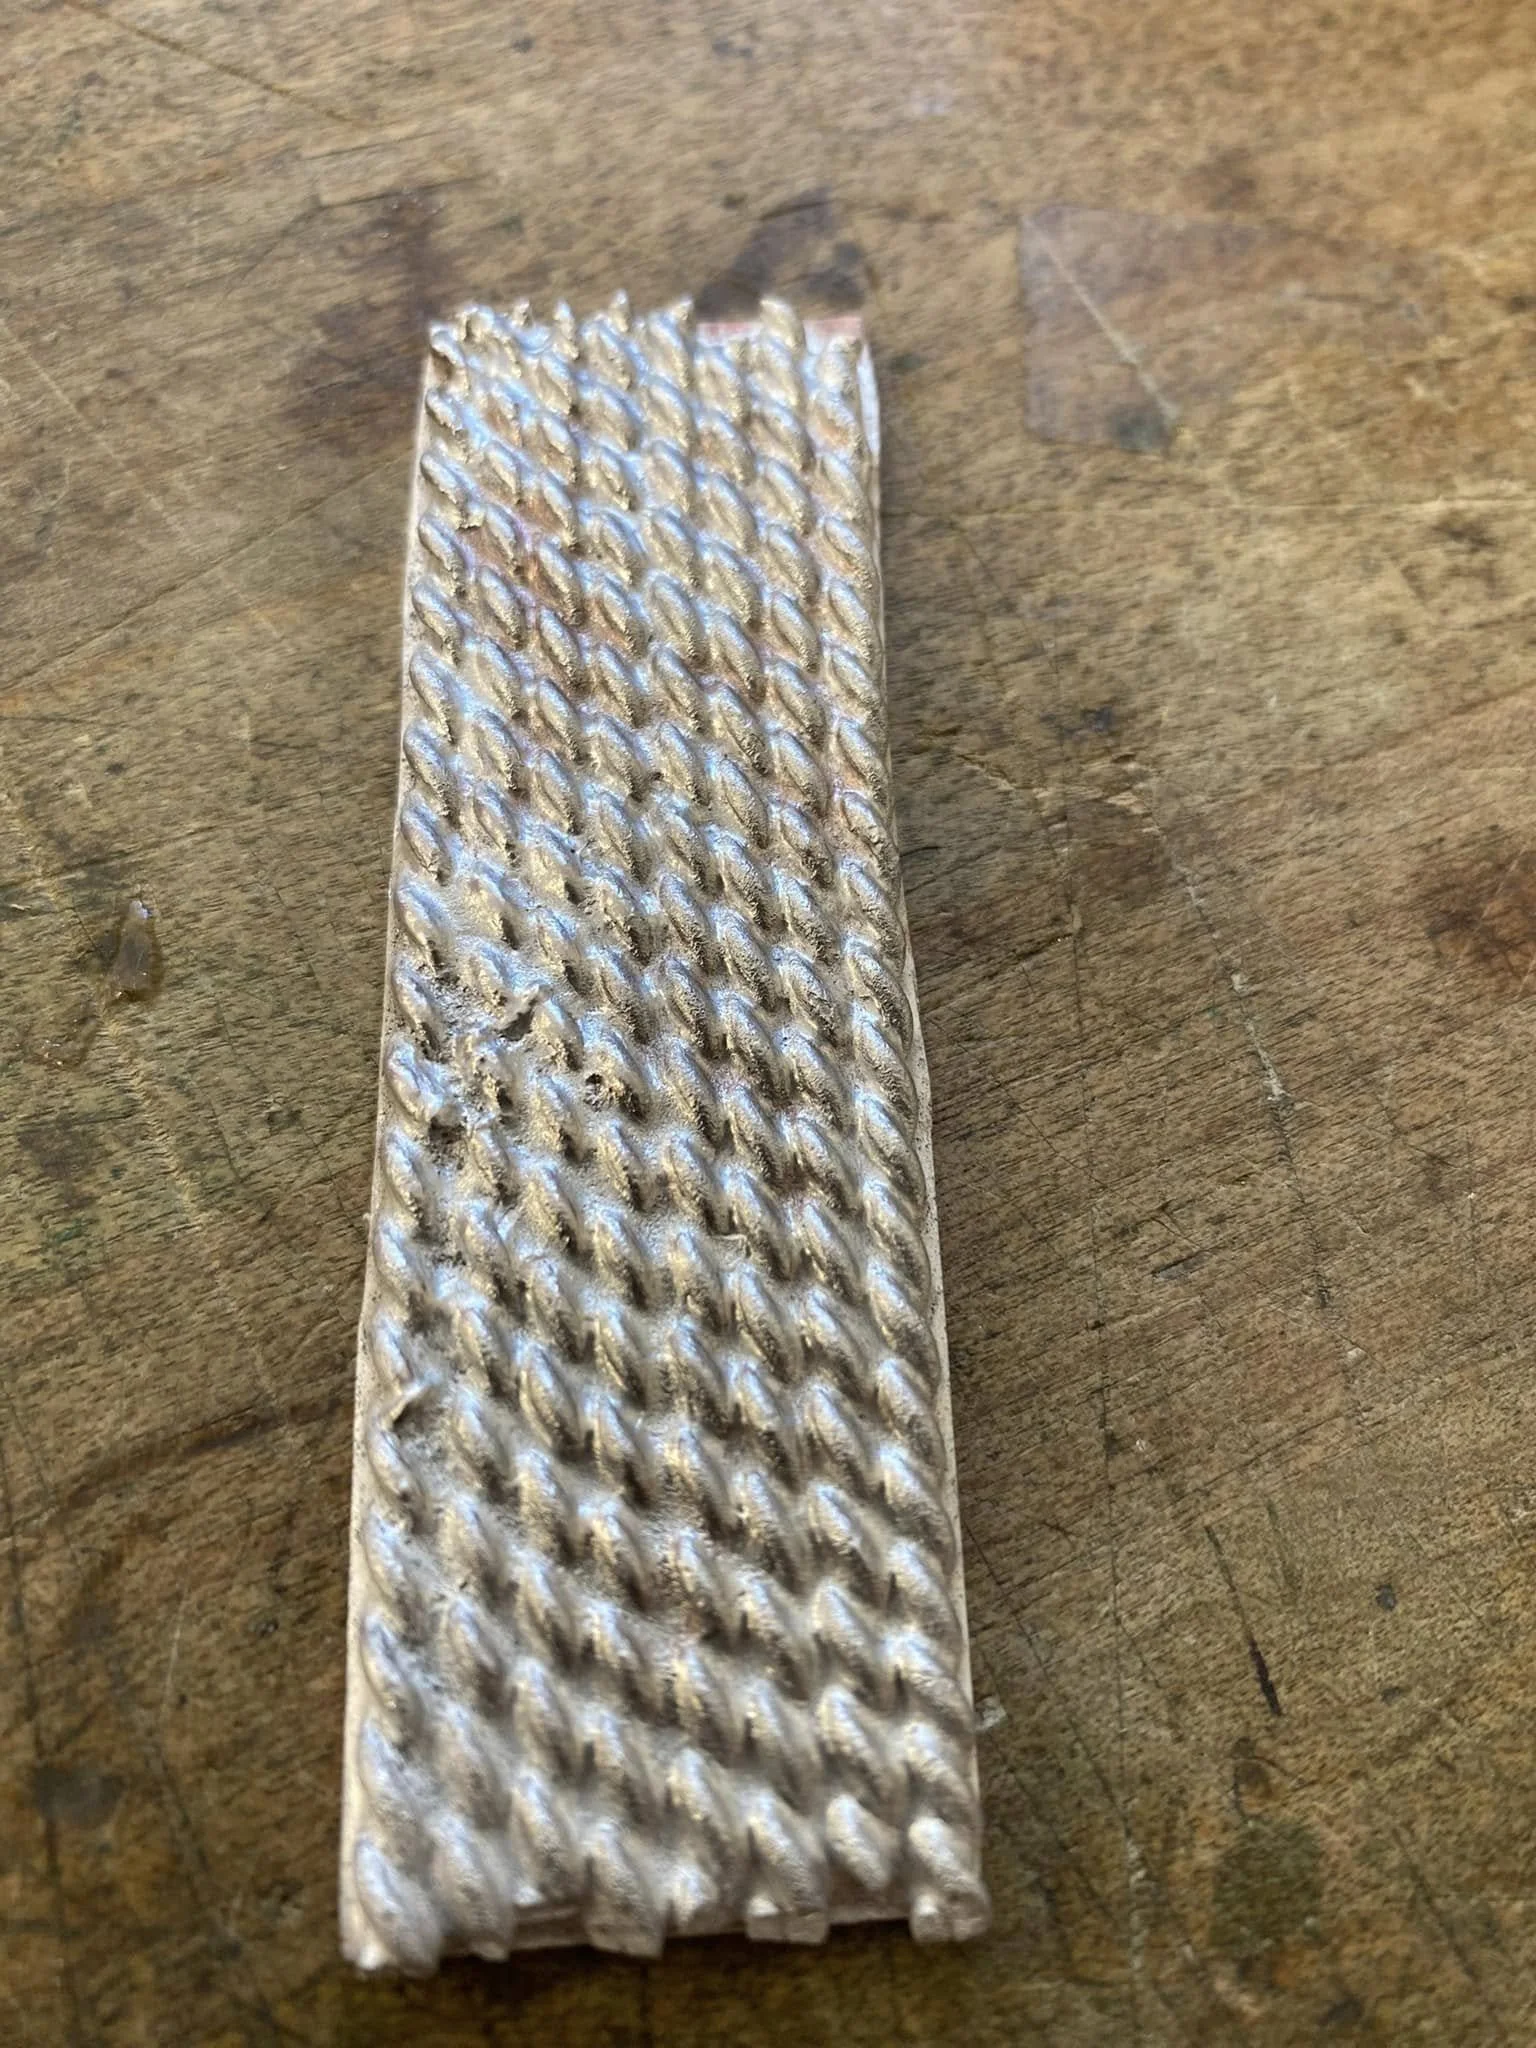
The Execution: Clean away the excess surface solder while the workpiece is still a thick, corrugated block. Run the rubber bristle wheels across the face to strip any solder away from the top plains.
The Protrusion Goal: Clean the piece until only the raised, protruding copper wire portion is completely clear of silver solder. The valleys can remain filled with solder, leaving the clean, raw, rounded copper ridges protruding naturally above those channels. Do not attempt to grind the block completely down flat at this stage; the metal remains thick and ribbed until it is compressed.
The Tool Logic: Flexible rubber bristles conform perfectly to the corrugated topography of the piece. They smoothly chew away the softer excess solder from the high spots without flat-spotting the raised copper wire ridges or leaving the deep, jagged scratches that metal files or rigid stone wheels leave behind.
9. Squaring the Sheet Sides (Crucial Pre-Roll Step)
The Timing: This step must occur after all soldering and cleaning sessions are finished, but completely before the piece enters the rolling mill or meets the hammer.
The Execution: Inspect the long sides of the copper backing sheet. If there is excess sheet metal protruding or sticking out past the outer edges of your wire matrix, you must use a jeweler's saw, shears, or a file to trim it flush down to the width of the wires.
The Logic: If you leave extra backing sheet sticking out past the sides of the matrix when passing it through the rolling mill, the structural stress is devastating. Because the rollers are compressing uneven thicknesses, the empty, un-reinforced edge of the backing sheet will actually split and tear crosswise—cracking from the outside edge of the sheet straight inward to the edge of the wire block—causing the metals to pull completely apart before the rollers even make contact with the body of the billet. Trimming it completely flush keeps the block aligned and prevents destruction under the mill rollers.
10. Compression Physics & Mandatory Annealing Schedule
The unique visual matrix pattern is born purely from mechanical deformation—compressing the raised, rounded copper ridges down flush with the solder valleys. Multi-metal laminates work-harden and become brittle incredibly fast under intense compression. If the metal becomes too hard, the copper elements will instantly shear, crack, or separate from the backing plate. Because of this, a strict thermal maintenance schedule must be integrated directly into this flattening phase:
The Annealing Requirement & Warning: Whether using a rolling mill or a hand hammer, you must stop and heat-soften the metal after every 2 or 3 compression passes. Place the sheet onto a soldering board, use a broad, bushy torch flame to heat the entire sheet uniformly until it reaches a dull cherry red, hold it there for a few moments so the heat penetrates completely, then instantly quench it in clean water to reset the metal's molecular structure. ⚠️ CRITICAL WARNING: Be extremely careful with your torch work during these annealing passes. You must heat the metal evenly but gently—if you get the block too hot, you will melt the internal silver-copper eutectic solder matrix, causing the structural bonds to fail and destroying the entire pattern on your bench.
Method A: The Rolling Mill (The Standard): Pass the clean, corrugated copper block through a rolling mill equipped with hardened steel flat rollers. Set the mill opening so the rollers just touch the protruding wire ridges. Pass the metal through in a single direction. Tighten the mill down slightly (no more than 15-20% reduction per pass) and roll it through again. Remember your annealing schedule after every 2 or 3 passes. The immense rolling pressure squishes and spreads those raised wire peaks flat and flush into the sheet perfectly evenly.
Method B: Hand Forging / Hammering (The Alternate): If you do not own a rolling mill, you can absolutely execute this entire process by hand using an anvil and a heavy hammer. Do not be discouraged if you lack heavy machinery; master smiths have done this by hand for centuries.
The Struggles: Forging a flat pattern by hand requires patience and stamina. Unlike a mill's perfectly flat steel rollers, a handheld hammer can easily strike at uneven angles, causing some wire ridges to squish faster than others or forcing the backing plate to curl and warp. It takes meticulous hammer control to keep the surface uniform. Remember to pause and execute your torch-annealing step after every comprehensive round of hammering to keep the plate from cracking.
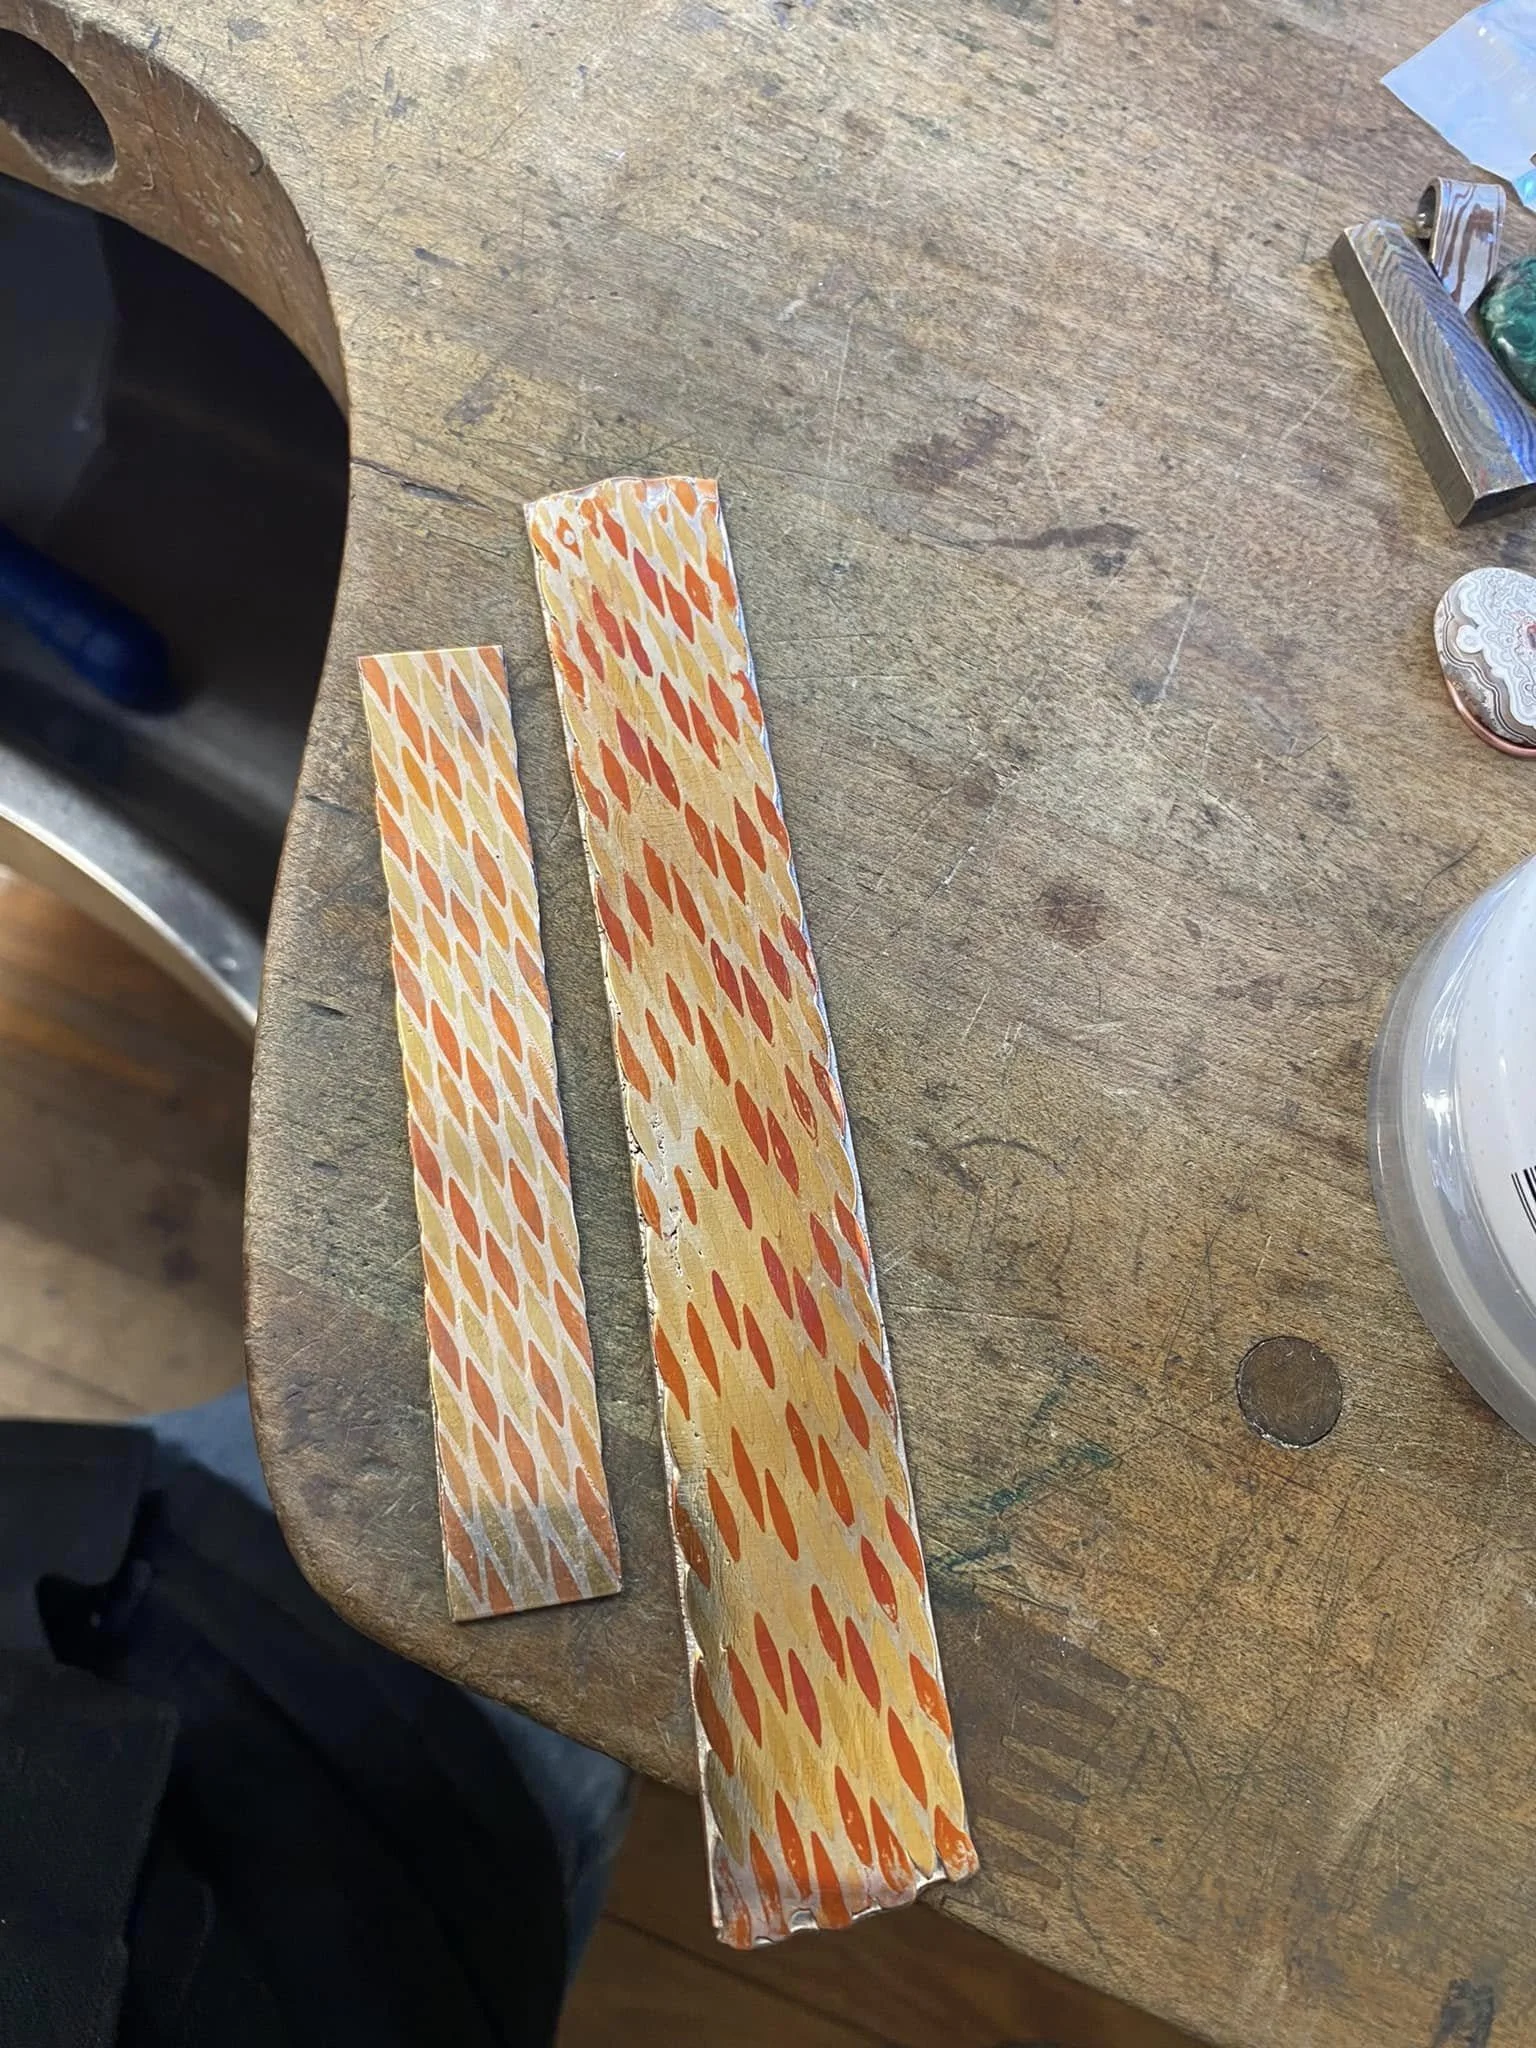
The Visual Array (The Result): Whichever compression method is chosen, squishing the rounded wire profiles flat reveals a stunning visual array of clean geometric seed patterns, repeating oval cells, and isolated metallic pools locked completely flat and flush inside a smooth, silver-bordered sheet.
🌀 SECTION 3: ALTERNATE TECHNIQUE – THE NAUTILUS SPIRAL METHOD
Because the coiling physics are entirely separate from a parallel row grid matrix, this technique forms its own distinct pattern architecture without using a rectangular base template.
1. The Spiral Layup & Prep
The Twist Stock: Twist a single, continuous, double arm-length strand of 14-gauge copper wire following the identical baseline from Chapter 3, Step 1. Do not cut this long braided rope into uniform segments.
The Nautilus Coil: Take the raw continuous braided rope and begin tightly wrapping it flat around itself in a tight, uniform circle like a cinnamon roll. Keep spinning the coil outward until your circular disc matches your target pendant diameter. This coiling method completely bypasses the need for side-sheet squaring.
2. Solder Fusing & Leveling
The Fusion Pour: Place the flat spiral disc directly onto a soldering block (a copper backing sheet can be placed underneath optionally, but the wire coils can also be fused directly to each other edge-to-edge). Apply high-temperature paste flux heavily and flood the entire disc uniformly with your silver-copper eutectic alloy solder, locking the concentric wire rings into a single solid circular block.
Clearing the Ridges: Once cool, skip the saw-trimming stage entirely. Take the solid disc straight to your Dedeco or 3M rubber bristle wheels. Grind away all top-surface excess solder on the raised portion until rounded peaks of the coiled copper spiral protrude from the disc face.
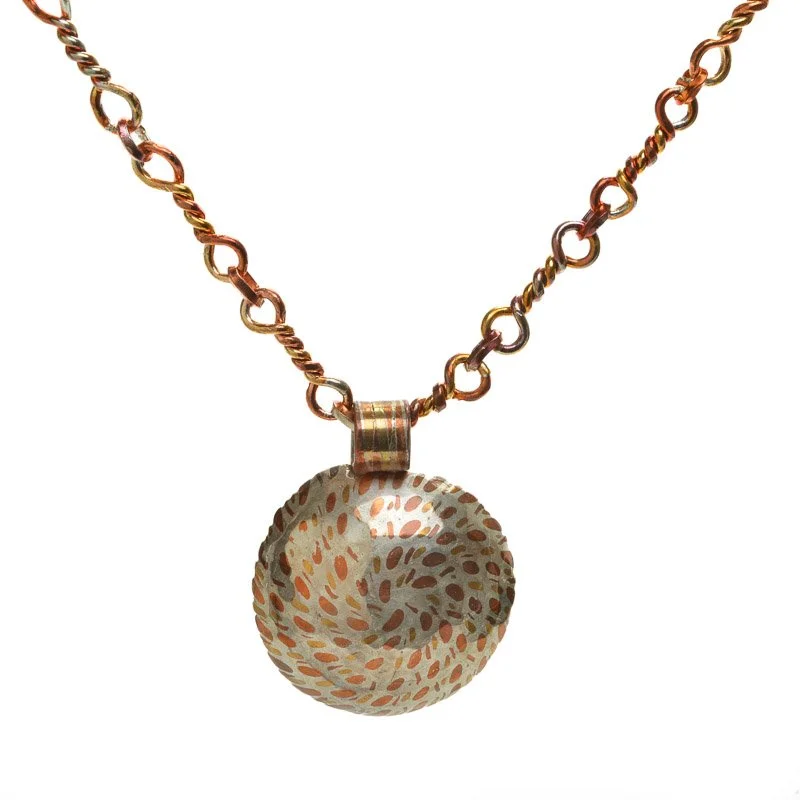
3. Hammer Flattening & Ball-Punch Doming
The Primary Squish: Place the thick, raised spiral block flat onto your polished steel bench block or anvil face. Strike the face uniformly with a heavy, smooth-faced hammer to compress the raised wire peaks flat down flush with the solder channels. This physical crushing transforms the spiral wire ropes into a flat visual array of radiating, geometric seed cells.
The Ball-Punch Dome: Place your flat, compressed mosaic disc face-down inside a matching curved indentation on a wooden or steel dapping block. Center a hardened steel ball punch directly over the back of the disc. Strike the punch firmly with the ball of a ball peen hammer to dome the metal and close any delaminations/cracks by forcing the metal to spread in all directions which forces the gaps closed.
The Visual Galaxy (The Result): Forcing the flat metal into a curved dome under the ball punch physically stretches the outer perimeters of the compressed mosaic matrix. This deformation causes the flattened oval copper cells to visually fanning outward in a swirling configuration, transforming the geometric concentric rings into a fluid, spinning cosmic vortex.
🔬 SECTION 4: ALTERNATE TECHNIQUE – REVERSE TWIST TYPE ONE (THE HERRINGBONE CHEVRON)
The Reverse Twist Type One method alters the structural geometry of the rows before lamination. By pairing right-hand twisted ropes directly against left-hand twisted ropes side-by-side, the rolling mill or hammer flattens the cell matrix into a stunning, repeating Herringbone or Chevron layout.
Because you are using different twist directions on the same billet, this is the exact technique where calibrating and matching your twist count matters to keep the pattern perfectly symmetrical.
1. Twisting the Opposing Ropes
To execute this pattern, you must spin two completely separate continuous strands with opposite rotation profiles:
Rope A (The Right-Hand Clockwise Twist): Follow the exact baseline from Section 2, Step 1. Chuck your 14-gauge folded copper wire loop into the drill and set the drill direction to Forward (Clockwise). Spin the drill slowly while keeping backward body weight tension until the spirals are tightly compressed. Mark this strand as "Right."
Rope B (The Left-Hand Counter-Clockwise Twist): Take a fresh double arm-length strand of 14-gauge copper wire, fold it in half, and clamp it into the bench vise. This time, switch your hand drill direction to Reverse (Counter-Clockwise). Spin the drill at the same speed, matching the tightness of Rope A as closely as possible. Mark this strand as "Left."
2. Slicing and the Alternating Layup
The Master Cut: Clip your first 5-inch segment from Rope A (Right) to act as your physical sizing template.
The 4x4 Grid Split: Cut exactly 4 segments at 5 inches from Rope A (Right), and exactly 4 segments at 5 inches from Rope B (Left) until you have 8 segments total.
The Alternating Matrix: Align the 8 segments side-by-side across your 1 cm bordered copper backing sheet in a strict alternating pattern: Right ➡️ Right ➡️etc. Left⬅️Left ⬅️etc.
The Visual Alignment: Pay close attention to how the ridges touch. Because the spirals twist in opposite directions, the diagonal ridges of the adjacent wires will mirror each other, forming a clean row of distinct "V" shapes across the grid.
3. Fusing and Pre-Roll Cleanup
The Bind and Flood: Wrap your thin, doubled-back stainless steel binding wire around the outer ends of the grid and twist the tips tight to lock the alignment. Pack with standard paste flux and flood the entire matrix completely with your silver-copper eutectic solder.
The Saw and Scrub: Allow to cool completely. Saw both ends clean off right inside the binding wire line to strip away all steel elements before pickling. Submerge in the pickle pot. Clear away the excess top surface solder with your Dedeco radial wheels or 3M rubber bristle discs until only the raised, protruding copper ridges are clear of silver.
The Side Trim: Trim the extra copper backing sheet completely flush to the wire borders to prevent the sheet from splitting crosswise from edge to wire under the roller stress.
4. Compression Physics (The Chevron Reveal)
The Flattening: Feed the clean, square billet straight through your flat rolling mill or compress it uniformly with your heavy forging hammer. Adhere strictly to your mandatory annealing schedule (heat to a dull cherry red with your torch and water quench every 2 to 3 passes, being careful not to overheat and melt your internal solder matrix).
The Graphic Mosaic (The Result): As the mill squishes the rounded ridges flat into the sheet, the mirrored diagonal spirals expand outward. Instead of a single uniform array of tilted seeds, the alternating rows lock together to form a highly graphic, smooth, two-dimensional array of repeating V-shaped chevrons, arrows, and interlocking zipper cells bordered by brilliant silver channels.
🔬 SECTION 5: ALTERNATE TECHNIQUE – REVERSE TWIST TYPE TWO (THE INTERLOCKING ZEBRA SLASH)
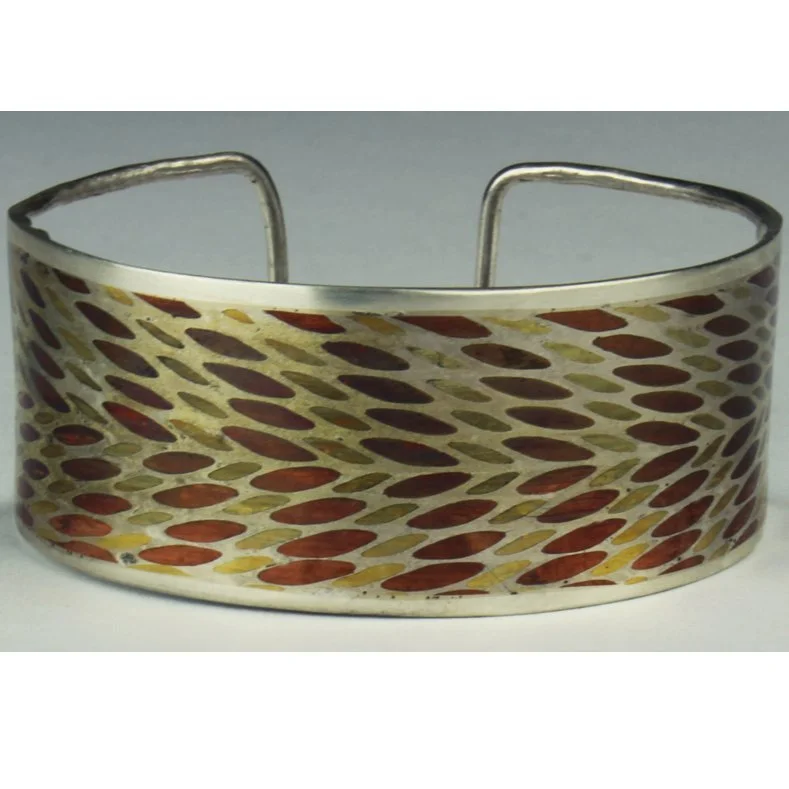
While Type One lines up opposing twists symmetrically to create unified "V" shapes, Reverse Twist Type Two shifts the alignment. By using full-length continuous strands but intentionally staggering the position of the twists side-by-side, the mechanical flattening forces the design to offset, producing a clean, geometric array of repeating diagonal slashes, parallel zig-zags, and interlocking zebra stripes.
There are no built-in sheet borders or framing rails during this fabrication phase—the pattern runs completely edge-to-edge across the lamination strap. Any smooth outer borders seen on the finished jewelry are decorative framing elements added completely separately after the rolling mill operations are done.
1. Preparing the Off-Set Strands
The Continuous Ropes: Follow the exact baseline from Section 6, Step 1 to twist your separate, long, continuous strands of 14-gauge copper wire: half twisted in Forward (Clockwise / Right-Hand) and half twisted in Reverse (Counter-Clockwise / Left-Hand).
The 5-Inch Cuts: Use your cutters to slice your wires into full-length 5-inch segments, keeping your Right-hand and Left-hand piles separated.
2. The Staggered Layup Sequence
The Base Strap Layout: Lay your 1 cm extended-length copper backing strap flat on your soldering board. You will be using the full-length 5-inch segments to fill the entire length of the strap.
The Intentional Shift: Arrange your segments side-by-side across the backing metal, alternating your Right-hand and Left-hand strands like this LRLRLRLRLRLR. As you place them, intentionally slide every other wire slightly up or down so that the diagonal ridges of adjacent wires are staggered and do not meet symmetrically.
The Resulting Flow: This intentional misalignment ensures that the mirrored twists are completely offset. Instead of locking into rows of unified arrow shapes, the diagonal ridges are staggered, setting up a sharp, interlocking pattern straight across the grid block.
3. Fusing and Pre-Roll Cleanup
The Bind and Flood: Wrap your thin, doubled-back stainless steel binding wire around the outer ends of the grid and twist the tips tight to lock this staggered alignment in place. Pack heavily with standard paste flux and flood the entire matrix completely with your silver-copper eutectic solder.
The Saw Workaround: Allow the billet to cool completely. Saw both outer ends clean off right inside your binding wire line to strip away 100% of the stainless steel wire fragments before pickling.
The Surface and Side Prep: Submerge the block into your pickle bath. Clear away the excess top-surface solder using your Dedeco radial bristle wheels or 3M rubber bristle discs until only the raised, protruding copper wire ridges are completely clear of silver. Trim the long sides of your copper backing strap perfectly flush down to the exact width of the outer wires to prevent the backing plate from splitting inward under rolling forces.
4. Compression Physics (The Zebra Reveal)
The Flattening: Feed the staggered billet straight through your flat rolling mill or compress it uniformly with your heavy forging hammer. Adhere strictly to your mandatory annealing schedule—heat the metal to a dull cherry red with your torch and water quench every 2 to 3 passes, being careful not to get it too hot and melt your internal silver solder bonds.
The Graphic Mosaic (The Result): When the mill squishes the offset, rounded ridges flat into the canvas, the asymmetrical ridges expand straight down. Instead of continuous curves or boxed frames, the pattern blooms into a spectacular, smooth, two-dimensional array of interlocking diagonal slashes, staggered parallel zig-zags, and geometric zebra stripes running completely edge-to-edge across the metal canvas, completely outlined by bright, crisp silver channels.
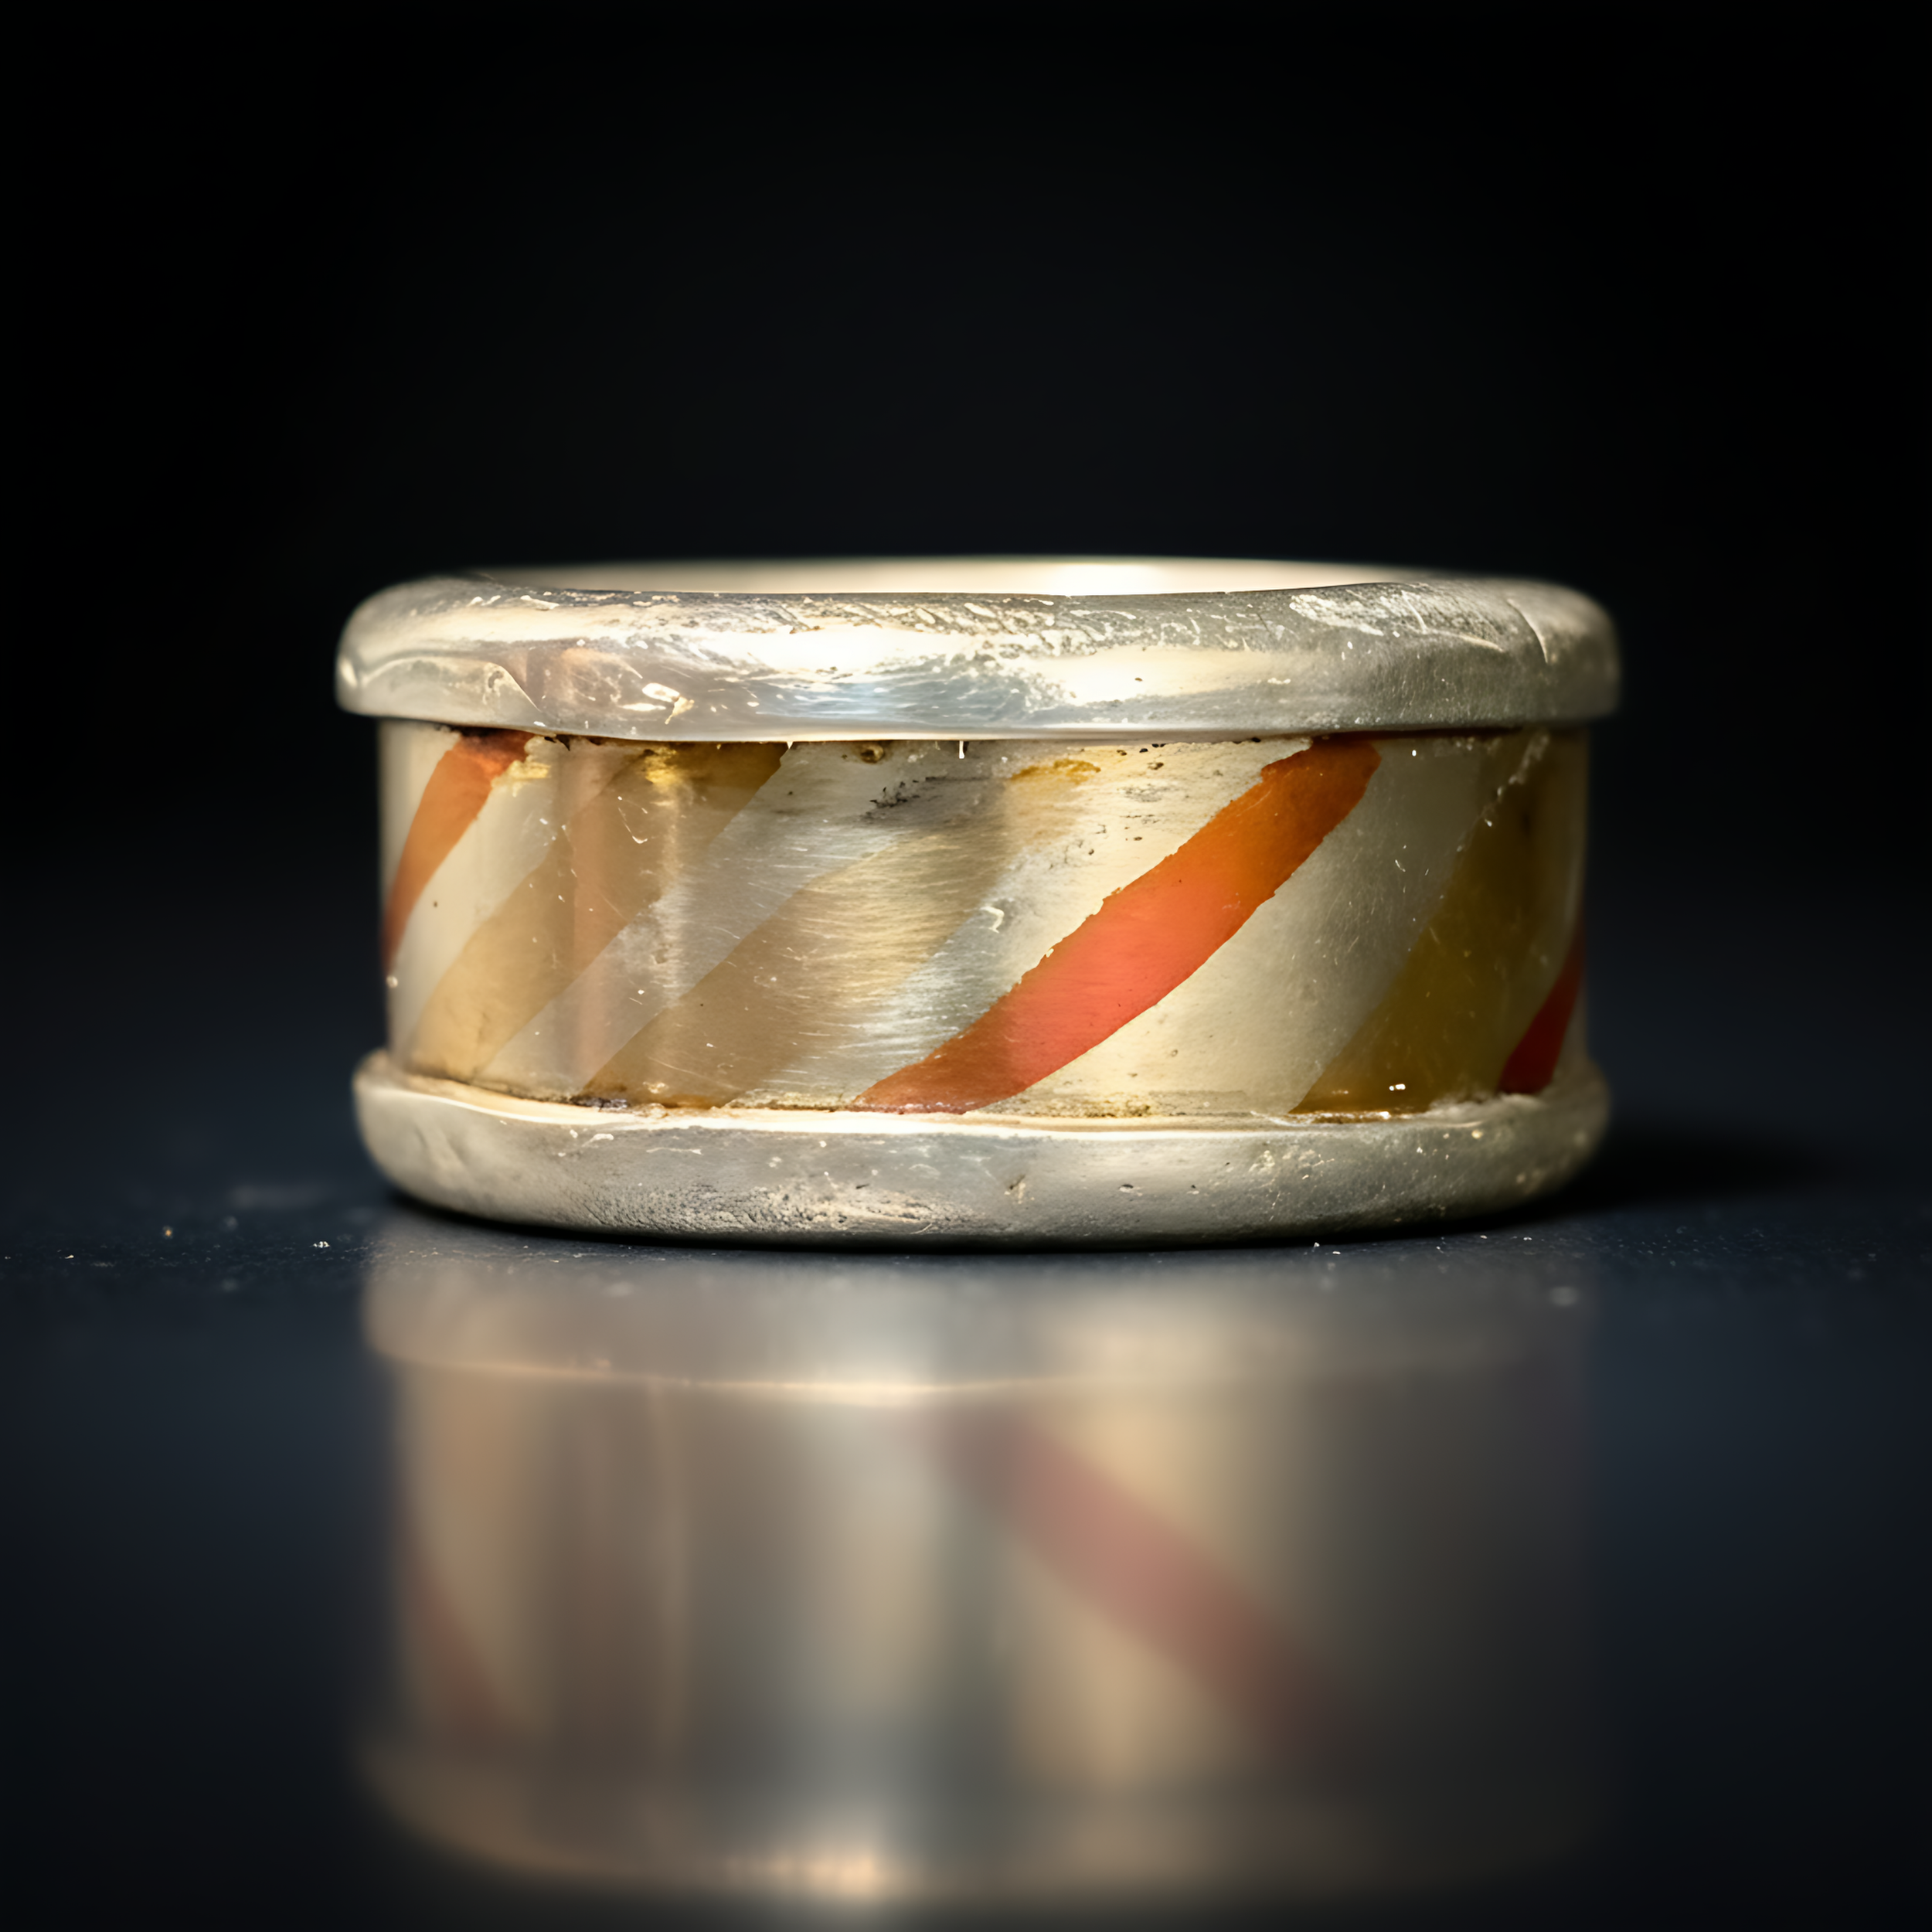
🔬 SECTION 6: ALTERNATE TECHNIQUE – THE HOLLOW-CORE MULTI-STRAND RING STRAP
Unlike cuffs and pendants that utilize a solid copper backing foundation, this specialized ring method relies on an entirely self-supporting lamination. By twisting 8 or more individual strands of 14-gauge copper wire together into a single, high-mass rope, you eliminate the under-sheet completely. The high-purity eutectic silver solder floods the entire internal core of the braid, creating a solid, skin-safe multi-metal alloy strap that can be worn raw or finished with a custom inner liner.
1. The High-Mass Bundle Braid
The Wire Count: Pull and measure your wire lengths about 8 inches. Cut a minimum of 8 (or more) individual strands of 14-gauge dead-soft solid copper wire.
The Tight-Lock Spin: Bundle all 8 copper strands parallel with zero crossovers. Clamp one combined end heavily into your bench vise. Gather the opposite loose tails and lock them together into the chuck of your variable-speed hand drill.
The Execution: Step back, applying full body weight tension to prevent the dense bundle from bowing or knotting. Spin the drill at a slow, deliberate speed. Continue twisting until the multi-wire bundle compresses into a single, incredibly dense, heavily ribbed rope.
2. Sizing and The Backless Solder Flood
The Sizing Cut: Release the massive copper rope from your vise. Use a heavy saw or compound cutters to snip a segment matching your target ring size circumference, leaving a tiny bit of extra room for finishing.
The Board Layout: Lay the raw, braided 8-wire rope segment directly flat onto your ceramic soldering board. There is no copper backing sheet or strap underneath.
The Core Flood: Pack the braided bundle heavily with your standard high-temperature flux paste, ensuring it penetrates deep into the center of the 8-wire core. Heat the entire mass uniformly with a broad torch flame. Feed your high-purity silver-copper eutectic solder wire directly into the hot braid. Continue feeding until the molten alloy fully saturates the internal core and fills every single gap between the 8 twisted wires, transforming the bundle into a solid, heavy multi-metal block.
3. Pre-Roll Cleanup
The Mechanical Cleansing: Once cool, pickle entirely until all little to no flux is left then. Take the solid, solder-flooded rope straight to your rotary tool or polishing arbor.
The Bristle Wheel Polish: Run your Dedeco radial bristle wheels or 3M rubber bristle discs aggressively across the entire exterior surface of the round rope. Strip all excess solder pools away until only the raised, rounded peaks of the 8 copper wire ridges are exposed.
4. Compression and the Seamless Cell Grid & Jagged Edge Removal then solder
The Flattening pass: Feed the round, cleaned 8-wire rope straight through your flat rolling mill flat, or place it on the anvil and flatten it uniformly with your heavy forging hammer. Adhere strictly to your mandatory annealing schedule—heat the metal to a dull cherry red with your torch and water quench every 2 to 3 passes, being extremely careful not to overheat and melt your internal silver solder bonds.
The Ring Strap Profile: Compression squishes those 8 raised wire profiles flat down flush against each other, expanding them into a smooth, flexible, completely flat structural strap.
Jagged Edge Grinding: Pay close attention to the outer profiles of the rope. Use a fine hand file or a belt sander/grinder to completely smooth out and remove any sharp points, flash lines, or jagged edges on the edges. The piece must be a smooth uniform sheet.
cut to ring length and solder into a ring with easy silver solder.
5. Lining Options and The Copper Oxidation Effect
Because you used a high-purity, zinc-free silver-copper eutectic solder alloy, the interior of this backless ring strap is 100% skin-safe and will not cause industrial chemical rashes or reactions . However, because the piece is an edge-to-edge matrix of raw copper and silver, the copper elements will naturally react with the wearer's skin acids, sweat, and moisture over time.
Option A: The Raw Matrix (The Green Skin Effect): You can leave the ring completely unlined, allowing the wearer's finger to make direct contact with the raw copper cells. Warn the customer that natural oxidation will cause a temporary, completely harmless green mark on their skin where the copper oxidizes. Many collectors love this raw, living metal reaction.
Option B: Fabricating a Silver Liner: If you want a clean, luxury finish that completely eliminates the green skin effect, you can take a thin sheet or strip of solid Argentium or Sterling Silver and solder it directly onto the back of your flat, rolled-out ring strap. This creates a solid precious metal barrier (a liner) that sits comfortably against the finger while showcasing the smooth, geometric copper cell mosaic on the outside of the ring.